Showing posts with label BeforeAfter's. Show all posts

Friday, February 17, 2012

Junk Drawer Be Junky No More!

I was feeling a little ambitious last week, and decided to tackle our junk drawer.  Or, it decided to tackle me, as I couldn't get it to shut.

Here's what I started with:


This was my first shot, but 'something' got in the picture too...


Silly belly, always getting in the way!

I started by emptying the drawer out completely and spread it out all over the counter.


I don't know how half this junk got in there, but I guess that happens when the drawer ends up being the place where you just dump things that have no other place to go.

There ended up being so much garbage in there, and stuff that really did have somewhere else to go.  Like the office, or the garage.

Once sorting through everything, and washing out all my organizers, I was left with this:


This picture makes me so happy.  Everything in it's place, and you can see everything.  There is also a little spot for the Hubbys wallet - perfect!

I'm proud to say that over a week later, it still looks just like this.

It will stay this way.

It will.


Wednesday, June 29, 2011

New Home For The Trunk!

We finally got our living room re-arranged with our new furniture (two recliners and a couch from Lay-z-Boy) and found a new home for the antique steamer trunk that my hubby re-did.

This is what our living room looked like before:


And now, this is what the area by the window looks like:


Doesn't the trunk look perfect there?  I think so.  Unfortunately I had to shut the blinds to take the picture but I love the way it looks with the blinds open, light shining in, and our pretty trunk in all its glory right in the middle.

I love the way it looks, like the hubby intentionally refinished it to coordinate with the recliners.

It just worked out so well.

In other living room news, see the small entertainment unit against the wall?


With our new furniture, it looked so heavy and bulky, and I just plain hated it.  The hubby and I have been talking for MONTHS about what to do to hold all of our electronic 'stuff'.

Ideally we want to do a built in around the fireplace.  Something like this:


Who knows when that will happen.

But in the meantime, we kept it simple by visiting one of the best stores ever.


LOVE it there.

The hubby took a 2x2 Expedit bookcase:


And made it work for us by turning it into this:


He took out the top divider and put in two shelves that would fit our PVR, Xbox, Wii and Bose system.

I lurve the way this looks, or will look, once I get another basket, cut out the back and hide all those cords on the left side.  Geesh, what an eyesore.  Didn't realize that until I uploaded the photo the this post!

Oh well.

It looks so much better than the old TV stand.  Much lighter looking and airier... if thats a word.

I love it when projects work out!

Wednesday, June 8, 2011

Mission: Accomplished (well, almost)

The hubby and I were super productive last Sunday afternoon tackling a few of the projects that I mentioned here.

We took a couple of hours, and got down to it!

I tackled the kitchen, and the hubby tackled the basement. 

I loves me some Before & After's so here we go!

Before
After
Close-Up Before
Close-Up After
Close-Up  Before
Close-Up After
Before
After

Before
After
Before
After

I feel so much better now that it's all done.  Before, anytime I opened one of cupboards I would get this tightness in my chest and found it difficult to breath.  I'm only slightly exaggerating.

I can't properly describe how good it feels to have properly organized cupboards, especially when there is room to spare!

I was also able to purge more items from the kitchen that was added to the 'Garage Sale' pile in the basement.

If you see anything here that you like, let me know!

The hubby took charge of the basement purge and re-organization, with input from me of course.

And some more Before and After's:

Before - Left Hand Side 
Before - View from Bottom of the Stairs
Before - Right Hand Side
Before - Right Down The Middle
After - Left Hand Side
After - Right Hand Side
After - Right Down The Middle

It's hard to get a good picture in the basement, it's so narrow.

It is so much nicer now.  We were able to clear out a lot of garbage and cardboard that really opened up space.  Everything has its place and there is extra room!  How can that not be a good thing.

We even have space dedicated for items that will be 'garage sale-d' soon.  I can't wait for this to all be open, empty space.

It feels so good to be able to cross these things off of my To-Do list.  There is still my closet remaining.  I've gotten a start on it, but still have to sort and purge my clothes.  I will post again once that is done.

Do you have nagging items on your To-Do list that you just can't seem to get to? Anything that you need to add to your To-Do list?

I seem to constantly be adding to my To-Do list.  It just keeps growing and growing!


Thursday, June 2, 2011

DIY Antique Steamer Trunk

Through our addictive watching of HGTV, we saw steamer trunks being used as coffee tables and were inspired to make it work for us!

My husband took his search to the handy-dandy, always helpful Craigslist where we found this beauty:

Front View

Back View

The Innards
Apparently, this steamer trunk came over from England full of potatoes over 100 years ago.   So says the guy we bought it off of, who bought it from a guy in Calgary eight years ago.

We bought this trunk for $100.  When we look at other antique steamer trunks for sale, they are significantly more expensive.  It's nutters.

As you can see from the photo's, its in a bit of rough shape, you might also say that it looks over a hundred years old.

While we wanted an antique looking trunk, we didn't want a dumpy looking, beat-up and ratty trunk sitting in the middle of our living room.

So, my husband sanded and stained the wood trim, primed and re-painted the metal, and repaired or removed the canvas and repainted.  He also ripped out the paper from the inside, sanded and stained it.


Had to throw this one in... because my puppy is so cute!
I absolutely LOVE how it turned out.  It far exceeded my expectations!  

As this project was getting closer and closer to the end, my husband became less and less sure that he wanted it to be our coffee table, and more and more that it should be somewhere else in our living room.

At this point, I'm not sure where it will go, but I'm super pleased with how it turned out. 

I clearly had nothing to do with this DIY, but have to give thanks to my super fantastically talented husband.  I heart you.


I will be linking this post with I Heart Organizing's linky party for Project: Projects and Show and Share Day at Just a Girl. Head on over to see some awesome projects!

Wednesday, May 18, 2011

I Can't Keep Putting This Off Forever...

I am terrible at goal-setting.  If I ever do set goals, I rarely, if ever, meet them.  

This post is my attempt at goal-setting and eventually, meeting them.  I'm hoping that the accountability of blogging about this, will force me into finishing these 'projects'.


Project #1: Re-Organize My Closet

Because it looks like this:


This may not look that bad, but it used to look so nice.... all organized and pretty.


This shelf has just become a mess of junk.  I hate it! Yet I keep adding to it everyday.  It shouldn't look like this. Ever.


I have got to find a better way to store all my scarves.  Originally I had them all folded and stacked all pretty, it looked like a rainbow.  Trouble with that was, I was always too lazy to fold them all up again.  Hence, the above photo.

To Do:
  • Purge clothes (I do this about every six months, if I can't remember the last time I wore it, or it doesn't fit anymore - it's gonzo)
  • Find better storage solution for my scarves and purses
  • Clear out the 'junk' shelf and use it for a purpose

Project 2: Re-Organize Basement Storage

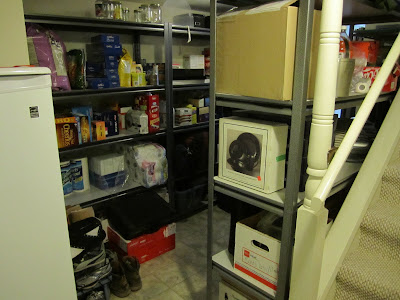
Even just thinking of tackling this is overwhelming!  We had this space in the basement that was too small to really be of any use to us, until we bought these fantastic shelves from Costco and decided to use the space as a pantry/storage area.  It started organized, and then stuff just kept getting put there.


View from the bottom of the stairs, looking to the right. Oh, and that is our upright freezer on the left.  Best thing ever!


A closer view of the shelves on the left hand side of the room. Notice all the stuff on the floor... I hate that!


The shelf on the right. Again, crap on the ground!


The view, in all it's cluttered glory.  It makes my chest all tight and anxiety-ey when I look at this.

Side note: thats my laundry room at the end of the hall.  It's so plain and boring.  I have a strong desire to make it pretty.  I'm sure it'll get done... eventually.

To Do:
  • Purge junk.  Get stuff together for a garage sale.
  • Create designated area's 
  • Put stuff together for garage sale

Project #3: Re-Organize The Kitchen

Sigh, the kitchen.  I have re-organized my kitchen three times since we moved into this house, and the last time I did it, I totally mucked it up.  Enough so that my husband comments on it almost every time he opens a  cupboard.

Here is the evidence:


This picture doesn't look too bad.  I absolutely love opening a cupboard and seeing all my Tupperware smiling at me.  The cupboard on the left is a mess, a little bit of everything is thrown in there, and it's too packed.  Why the cupboard on the left doesn't work, will make sense when you see the next photo.


I have no idea what I was thinking when I decided to put all the spices, sauces and random canned goods all put together on a deep shelf.  Oh, I remember, I was thinking, I'll put all the things that I don't use on a regular basis towards the back.  Made sense at the time, until I needed to use one of the items at the back.  It was a HUGE pain in the rear.  It just makes no sense.  And my China doesn't belong there, in amongst non-perishables.


Look at that.  Ridiculous.


When I look at this picture, I see wasted space.  I know that I can fit my China in this cupboard, somehow.  This cupboard can be used way more efficiently.


This is the cupboard in our island/bar thingy.  It also houses Jasper's food, which is why I was unable to get a shot of it with out him sniffing it out.  This cupboard is so crammed with random stuff, it makes it very difficult to get a pups food.  We've got candles, table cloths, platters and plates.  I don't like it, not one bit.  It didn't use to be this way.

To Do:
  • Empty out every cupboard in question
  • Decide if I want to purge any 'houseware' item, and put it with garage sale items
  • Put it all back into the cupboards, but in a smarter, more efficient way
Oh my goodness,  this is a long post, and an overwhelming one.  Seeing it all laid out like this.  It's OK, I can do this.  I know I will feel so much better once this is all taken care of.  I also know that by the time I'm finish these projects, there will be more to do.  It's never ending, isn't it?

As I complete a project I will post about it.   Hopefully you won't have to wait to long to see it!

Do you have any projects on the go?  Been putting anything off?  What is something that you have been dreading tackling? (Mine would be the basement storage!)